zion national park overlooks Guide
Complete guide to Zion National Park overlooks with parking strategies, trail logistics, and golden hour timing for 6 must-see viewpoints. Canyon Overlook to Observation Point.
You’ve seen the photographs—those sweeping canyon views that make Zion look like another planet. But here’s what nobody tells you: half of Zion’s most iconic overlooks require strategic planning just to find parking, and the other half are buried in generic “best hikes” lists where you can’t tell which viewpoints are actually worth your limited vacation time. You have 2-3 days max in Zion and need to prioritize the overlooks that deliver the biggest payoff.
You’re overwhelmed trying to figure out which viewpoints require the shuttle, which need permits, and which you can drive to. Every blog says “stunning views” but won’t tell you what you’re actually looking at or whether it’s worth the 4-hour round-trip hike.
This guide cuts through the noise. You’ll get exact overlook recommendations organized by effort level, honest assessments of which viewpoints are overhyped versus underrated, specific logistics including parking arrival times, shuttle stops, and permit requirements, plus photography timing for each viewpoint so you’re not shooting into harsh midday sun.
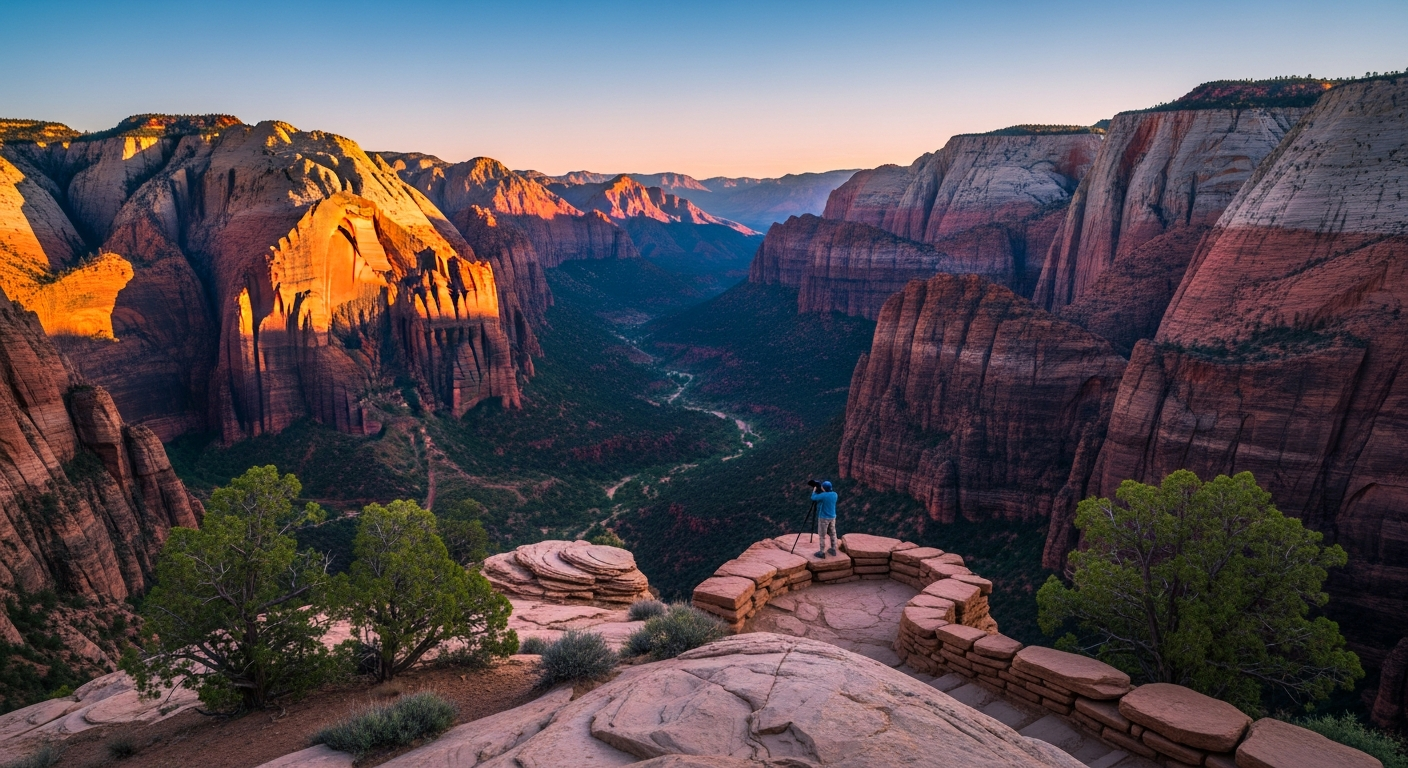
Canyon Overlook Trail Zion

If you only have time for one Zion overlook hike, this is it. Canyon Overlook Trail delivers the best views-per-mile in the entire park: 1 mile round-trip, 160 feet elevation gain, 30-45 minutes total.
You’ll get unobstructed views down into Pine Creek Canyon, straight across to East Temple, and a bird’s-eye perspective of the famous Zion-Mount Carmel Highway switchbacks snaking below. The geological payoff is disproportionate to the effort required.
The trailhead sits just east of the long tunnel on Zion-Mount Carmel Highway—no shuttle required, drive-accessible year-round. This is the critical advantage: you control your own timing.
But the parking lot fits roughly 10 cars. During peak season (April through October), you need to arrive before 8 AM or plan to return after 6 PM when day-hikers clear out. I’ve watched visitors circle this lot for 20 minutes at 10 AM in June and give up. Don’t be that person. Arrive early or save this for your final afternoon.
The trail itself is paved for the first half, which sounds easy until you hit the slickrock section with actual dropoffs. The park has installed chains on the most exposed sections—not because the trail is dangerous for competent hikers, but because it’s not suitable for anyone with severe height anxiety. Test yourself on the first 0.3 miles; if you’re uncomfortable with exposure, turn back without guilt.
Photography Timing for Canyon Overlook
This overlook faces east, which means sunrise is your golden hour. Arrive 30 minutes before sunrise to set up—the first light hits the canyon walls in layers of orange and pink, and the shadows in Pine Creek Canyon create dramatic depth.
Midday is brutal here; the overhead sun washes out sandstone colors and creates harsh shadows that flatten the image. If you can’t do sunrise, shoot before 10 AM or return after 4 PM. Sunset doesn’t work here because you’ll be shooting into backlit cliffs, but the 20-30 minutes after sunset brings alpenglow to East Temple that’s genuinely magical.
Observation Point Zion National Park

Observation Point is the most complete panoramic view in Zion National Park. From this summit, you get 360-degree perspective: the entire Zion Canyon floor stretches beneath you, Angels Landing sits in your frame (not the opposite way around), and the valley extends toward Springdale in the distance. It’s the view that makes you understand why the canyon is so massive. This is an 8-mile round-trip commitment with 2,148 feet of elevation gain—4 to 6 hours total depending on your fitness and how many times you stop to catch your breath.
Here’s the logistics detail most guides skip: there are two routes to Observation Point, and they’re drastically different experiences. The classic East Rim Trail from Weeping Rock is 8 miles round-trip and requires shuttle access to stop #8 during April through October. Check the current NPS status before planning—Weeping Rock area trails have periodic closures due to rockfall. The backdoor route, East Mesa Trail, is only 6.4 miles round-trip with just 600 feet of elevation gain. The catch: it requires a high-clearance vehicle to access the trailhead via dirt roads on the east side of the park. If you have 4WD or high clearance, this route is a local secret that lets you skip crowds and shuttle requirements entirely.
Start this hike by 6 AM in summer to avoid afternoon thunderstorms—they materialize fast in the high country and lightning is genuinely dangerous. Carry 3 or more liters of water per person; there’s zero shade after the first mile. No permit is required for Observation Point (unlike Angels Landing), but verify current trail status at the visitor center before you commit to this route.
Why Observation Point Beats Angels Landing for Views
Angels Landing is more famous, but Observation Point delivers more visual information. From Angels Landing, you’re standing on a narrow ridge looking at the surrounding canyon. From Observation Point, you’re elevated above the entire valley. Angels Landing appears in your photograph as a distinct peak. The view encompasses the Zion Canyon system, not just a single dramatic formation. Plus, Observation Point has actual summit space where you can sit and absorb the scale without fighting crowds on exposed chains.
Drive-Up Overlooks: Zion National Park Driving Map

Most visitors assume that if an overlook doesn’t require a hike, it’s not worth stopping for. This assumption costs them the most geologically unique views in the park. The Zion-Mount Carmel Highway (Highway 9) between the two tunnels contains several legitimate overlooks that deliver visual payoff with zero effort.
Checkerboard Mesa pullout is the standout. The mesa’s crosshatch erosion pattern—the result of vertical and horizontal joint fractures weathering at different rates—is one of the most distinctive geological features in Utah. This pattern shows best in direct overhead light, which means midday is actually ideal here (unlike shadowed canyon overlooks). The pullout is small and unmarked; you’ll spot it by the distinctive checkered cliff face on the east side of the highway. There’s parking for maybe 5-6 cars. If the lot is full, loop back in 10 minutes.
Between the two tunnels, you’ll find additional pullouts with views of the Great Arch and Crazy Quilt Mesa. These aren’t famous because they don’t photograph like classic canyon vistas. They’re geological teaching moments—the rock formations tell stories about how water and time reshape stone. Mark these on your Zion National Park driving map before you go; cell service is spotty, and you’ll miss them if you’re not watching.
The Hidden Drive-Up: Watchman Trailhead Overlook
Here’s the local secret: most people hike Watchman Trail (2.7 miles, 368 feet gain), but the viewpoint at the trailhead parking area itself offers authentic Zion aesthetic views with zero effort. You’re looking at Watchman peak, Bridge Mountain, and the Virgin River with cottonwoods that turn brilliant gold in late October. It’s fully paved and ADA-accessible. You’re essentially looking at the same view hikers work 2 miles to see, just from a lower angle. If you’re short on time or energy, this is a legitimate alternative to committing to the full trail.
The Pa’rus Trail is Zion’s only paved, bike-friendly path with multiple river-level overlook spots. It’s not dramatic—you’re looking at the Virgin River and canyon walls at close range, not sweeping vistas—but it’s perfect for families with strollers, sunset walks, or rest-day activity when you need gentle views without elevation gain. Start from either Zion Canyon Visitor Center or South Campground. No shuttle required.
Zion National Park Utah Map: Planning Your Overlook Route

Your Zion National Park Utah map should show two distinct zones: the main Zion Canyon (shuttle-dependent April-October) and the east side route (Highway 9, drive-accessible year-round). Most first-time visitors focus on the canyon and miss the east side entirely, which is a strategic error.
The Zion Canyon Scenic Drive requires the shuttle system during peak season. Stop #4 is Court of the Patriarchs Viewpoint—a paved 100-yard walk with views of Abraham, Isaac, and Jacob peaks. It’s crowded and brief, but it’s the iconic “three peaks” shot. Stop #5-6 area has an unofficial pullout with river views and Cathedral Mountain framed perfectly. The end of the road (stop #9) is Temple of Sinawava, where Riverside Walk begins and you can see the entrance to the Narrows. These shuttle stops are unavoidable if you want main-canyon views, but they’re efficient because you’re not fighting parking.
The east side route via Highway 9 is where you reclaim control. Start at Checkerboard Mesa pullout, hit the tunnel viewpoints, then drive to Canyon Overlook Trail. This entire sequence takes 2-3 hours with photography time and requires zero shuttle coordination. It’s perfect for early morning arrivals from the east entrance or anyone staying in Springdale who wants to avoid shuttle crowds.
The Overlooked Overlooks: Kolob Canyons Section
Kolob Canyons is a separate entrance 40 miles north of main Zion Canyon. Most visitors never mark this on their Zion National Park Utah map because it seems like a detour. Timber Creek Overlook Trail is 1 mile round-trip to views of Kolob Fingers and Pine Valley Mountains. It’s uncrowded, requires no shuttle, and features completely different geology than the main canyon—red sandstone towers instead of massive walls. If you have an extra half-day, this detour is worth the drive time.
Zion National Park Aesthetic: Best Overlooks for Photography

Every overlook in Zion looks dramatically different depending on time of day. Golden hour—the first and last two hours of daylight—is when the sandstone glows. But there’s a secondary window that most photographers miss: 20-30 minutes after sunset, when the sky is still blue but the sandstone catches alpenglow and glows orange-pink. This is when the light is most dramatic.
East-facing overlooks (Canyon Overlook, Observation Point, Watchman Trail summit) capture sunrise best. West-facing locations (Court of the Patriarchs, Pa’rus Trail bridges) work for sunset. If you’re shooting Angels Landing from the Scout Lookout approach, you get western light on the formation itself, which is why that view is so iconic in afternoon photos.
The technical detail that separates good Zion photos from great ones: bring a polarizing filter. Midday sandstone glare is brutal; a polarizing filter cuts that glare and deepens blue sky contrast dramatically. You’ll shoot more effectively even in harsh midday light. For lens choice, 16-35mm wide-angle works for expansive overlooks, while 70-200mm telephoto compresses the layers of rock at Observation Point into visual drama.
Composition Strategy for Zion’s Unique Geology
The obvious overlook platform is where everyone shoots from. Move 50 feet left or right—side angles often reveal better compositions because you’re seeing the canyon’s depth differently. Zion’s tall canyon walls work better in vertical/portrait orientation than landscape. Include scale in your frame—a hiker, a tree, or the shuttle bus shows viewers the breathtaking size of the walls. Foreground elements matter: use juniper trees, sandstone edges, or wildflowers to frame distant canyon views. Without foreground interest, even great Zion vistas feel flat.
Avoid shooting the same angle everyone else has. The most-pinned Zion photos are taken from the exact same spot. If you want something distinctive, shoot vertical panoramas (stitch multiple frames vertically), include unusual foreground elements, or return during less-obvious times like dawn or dusk when light angles are extreme.
Overlooks by Difficulty: Matching Views to Your Ability

Not every visitor has the fitness for an 8-mile, 2,000-foot elevation gain hike. Not every visitor is satisfied with a 5-minute overlook either. Here’s how to match overlooks to your actual ability and available time.
Easy Wins: Overlooks Under 2 Miles Round-Trip
Canyon Overlook Trail (1 mile, 160 feet gain, 30-45 minutes) is the baseline. It’s the single best bang-for-buck viewpoint in Zion—more iconic views per minute of effort than almost any other trail. Watchman Trail (2.7 miles, 368 feet gain, 1-1.5 hours) sits just above this tier but still qualifies as accessible. Archaeology Trail near South Campground is 0.5 miles with minimal gain—it’s an interpretive overlook more than a dramatic viewpoint, but it’s perfect for families or anyone needing a rest-day activity. These overlooks work for first-time visitors, families, or when you’re saving energy for other activities.
Moderate Commitment: 3-6 Mile Overlook Hikes
Hidden Canyon Trail takes you 2.4 miles to an overlook point (before the canyon itself), 850 feet gain, and gives you views across to Angels Landing. You’re not entering the canyon; you’re stopping at the overlook. Emerald Pools Upper Trail is 3 miles round-trip, 350 feet gain, and overlooks the lower canyon. Scout Lookout (the Angels Landing approach without the chains section) is 4 miles round-trip to the overlook before the final scramble—no permit required, still gets you 1,000 feet above the canyon floor. These hikes require genuine effort but aren’t all-day commitments.
Advanced: Full-Day Overlook Expeditions
Observation Point (8 miles, 2,148 feet gain, 4-6 hours) is the ultimate panoramic overlook. Angels Landing summit (5.4 miles, 1,488 feet gain, 3-4 hours) requires a permit via recreation.gov—it’s a lottery system, book 3 months in advance. West Rim Trail to Cabin Spring is 7+ miles with views into Left Fork and beyond the main canyon. These require 5-7 hour commitments, early starts, and 3+ liters of water per person. But the views justify the effort.
CONCLUSION: Your Zion Overlook Game Plan

Here’s the single most important takeaway: Canyon Overlook Trail is non-negotiable. Even if you only have 2 hours in Zion, prioritize this 1-mile hike. You’ll get the most iconic Zion aesthetic views in the least time. It’s the overlook that defines the park.
Before you arrive, download a Zion National Park Utah map pdf (available at nps.gov/zion) and mark your must-see overlooks based on your fitness level and available time. Observation Point delivers the most complete panoramic view, but the East Mesa backdoor route saves 2 miles if you have high-clearance vehicle access. Drive-up overlooks along Highway 9 are legitimate alternatives to crowded shuttle-access viewpoints—don’t skip them assuming they’re just pullouts. Time your overlook visits for golden hour (first and last 2 hours of daylight) to capture the authentic Zion aesthetic in perfect light. Pack a polarizing filter and a wide-angle lens. Arrive at popular overlooks (Canyon Overlook, Observation Point) before 8 AM April through October to secure parking. Check current trail status on NPS.gov/zion before planning—Weeping Rock area trails have periodic closures. Reserve Angels Landing permits 3 months in advance if summit views are non-negotiable. Book lodging in Springdale for easiest access to both the shuttle system and east-side drive-up overlooks.
Your next move: Open a map right now and mark three overlooks—one easy (Canyon Overlook), one moderate (Hidden Canyon or Watchman), and one full-day commitment (Observation Point or Angels Landing). Decide which fits your available time and fitness level. Check permit requirements for Angels Landing if that’s on your list. Set an alarm for 6 AM on your first morning in Zion and head straight to Canyon Overlook Trail before the lot fills. You’ll have the views and the parking. Everything else builds from there.